
01 / THE QUICK ANSWER
Choose by your starting material
Choose SadTalker for a portrait that needs generated head movement. Choose MuseTalk to give an existing video new speech while keeping its visual performance. Both can also use a still portrait with audio; the main difference is how the rest of the face and head move.
SadTalker
You have a portrait and narration. You want the model to create a talking face, including expression and head movement.
Try it for: a profile introduction, a narrated lesson or a character speaking to camera.
Start with a portrait →MuseTalk
You have a presenter clip and new narration. You want to keep the source pose and gestures while updating the mouth.
Try it for: a translated presenter clip, a new voiceover or a repeated avatar workflow.
Start with your source →02 / AT A GLANCE
The differences that matter
Use this table to choose a workflow. Then watch the examples to decide which style of movement suits your project.
On a small screen, swipe the table sideways to compare both columns.
| What matters | SadTalker | MuseTalk |
|---|---|---|
| Your starting point | One portrait and a speech recording. | A video or portrait, plus a speech recording. |
| What it creates | A talking face with generated expression and head movement. | New lip movements blended into the source face. |
| Where movement comes from | The model generates movement; still mode helps keep the pose steady. | A source video supplies the head movement and gestures. A photo gives a mostly steady pose. |
| A good first project | Turn a profile portrait into a narrated introduction or lesson. | Give a presenter clip a new voiceover, or lip-sync a portrait. |
| Changing a video’s language | Create a new talking portrait using your translated narration. | Keep the original visual performance and sync it to translated narration. |
| Face processing | 256- or 512-pixel model options; framing depends on preprocessing. | Works on a 256 × 256 face region and blends it into the source frame. |
| Controls to learn first | Crop/full framing, still mode and optional face enhancement. | Source framing, face crop alignment and speech timing. |
| Repeated clips | Generate a new talking-head clip for each narration. | The realtime workflow can prepare an avatar once and reuse it for new audio. |
| Beginner interface | A hosted demo or the community ComfyUI workflow shown below. | The community ComfyUI workflow shown below, or the official app. |
| Code license | Apache 2.0 in the official repository. | MIT in the official repository. |
Workflow and license details: official SadTalker repository and official MuseTalk repository. Interface controls vary by the app or community workflow you use.
03 / ORIGINAL EXAMPLES
Same portrait. Same speech. Two approaches.
We ran SadTalker v0.0.2 and MuseTalk 1.5 on an RTX 3090 (24 GB), using the same portrait and eight-second narration. Both received the same prepared files. Play one clip at a time to compare the mouth, eyes and steadiness of the face.
What to look for: SadTalker builds the face’s expression and motion from the portrait; still mode keeps this example’s pose calmer. MuseTalk uses the portrait as its visual foundation and updates the speaking region. A source-video MuseTalk project would carry the movement from that video.
What happened on this GPU
| Measurement | SadTalker | MuseTalk 1.5 |
|---|---|---|
| Complete render, run 1 | 96.4 seconds | 33.6 seconds |
| Complete render, run 2 | 87.9 seconds | 33.8 seconds |
| Peak sampled GPU memory | 3,443 MiB | 7,763 MiB |
| Exported video | 512 × 474 · 25 FPS | 512 × 474 · 25 FPS |
Each timing starts a fresh process and includes model loading, face preparation, generation, full-frame composition and MP4 export. Model downloads, shared input preparation and browser-copy encoding sit outside the timer. GPU memory is whole-device usage sampled every 0.5 seconds, including baseline usage.
See the input preparation and exact run method
We resized the same synthetic presenter portrait once to a frame with a maximum dimension of 512 pixels and even width and height. We took the first eight seconds of the same narration and converted it to mono 16 kHz WAV. The SHA-256 hashes in the run record confirm that both tools received identical files.
Two renders per model ran sequentially after setup. Each used a fresh Python process with downloaded model files already available. The run record includes upstream revisions, Python, PyTorch and CUDA versions, settings, media metadata and memory samples. Both exports contain video and audio streams and completed a full decode check.
The players show H.264 copies for browser compatibility, encoded at CRF 18 with the audio stream copied. Native model exports are available below. Run 1 supplies each displayed example.

04 / SEE THE INTERFACE
Follow the workflow, one step at a time
These screenshots show community ComfyUI workflows. ComfyUI is a visual workspace: each box, called a node, handles one part of the job. Start with the input controls and follow them toward the video output.
SadTalker: connect a portrait and speech
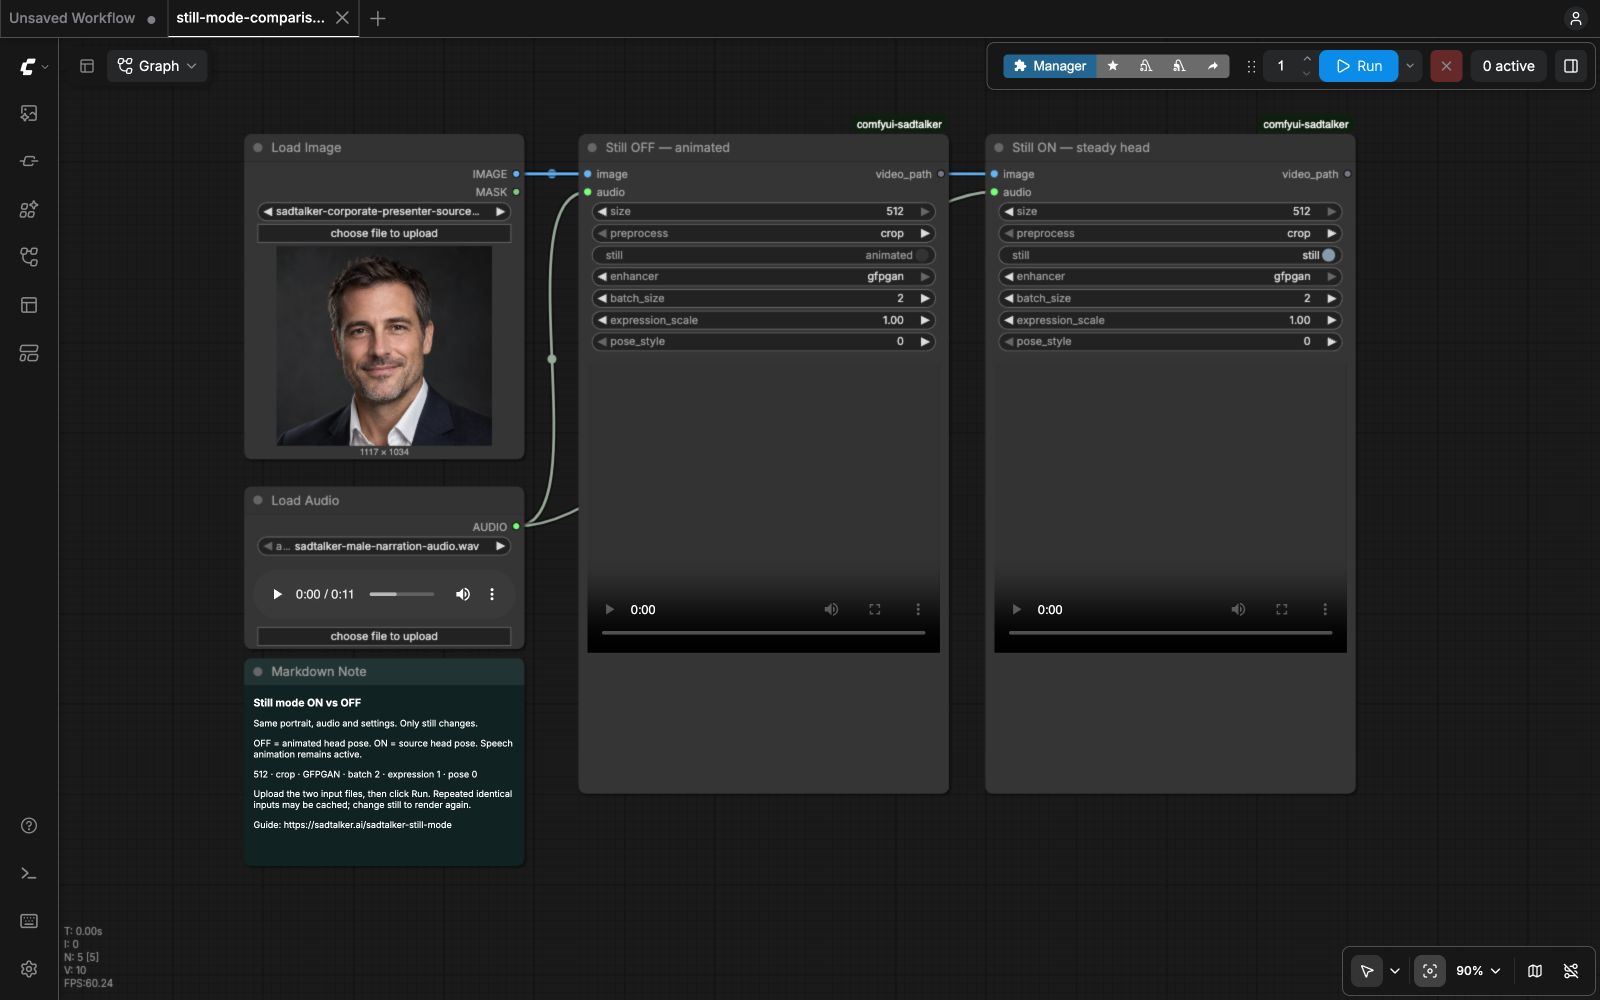
- Load your portrait. Choose a clear image with one visible face.
- Load your narration. Use a short speech clip so the preview is quick to review.
- Choose framing and movement. Start at 256, crop, enhancement off. Use still mode when you prefer a steadier pose, then run and preview the MP4.
MuseTalk: upload the source and new speech
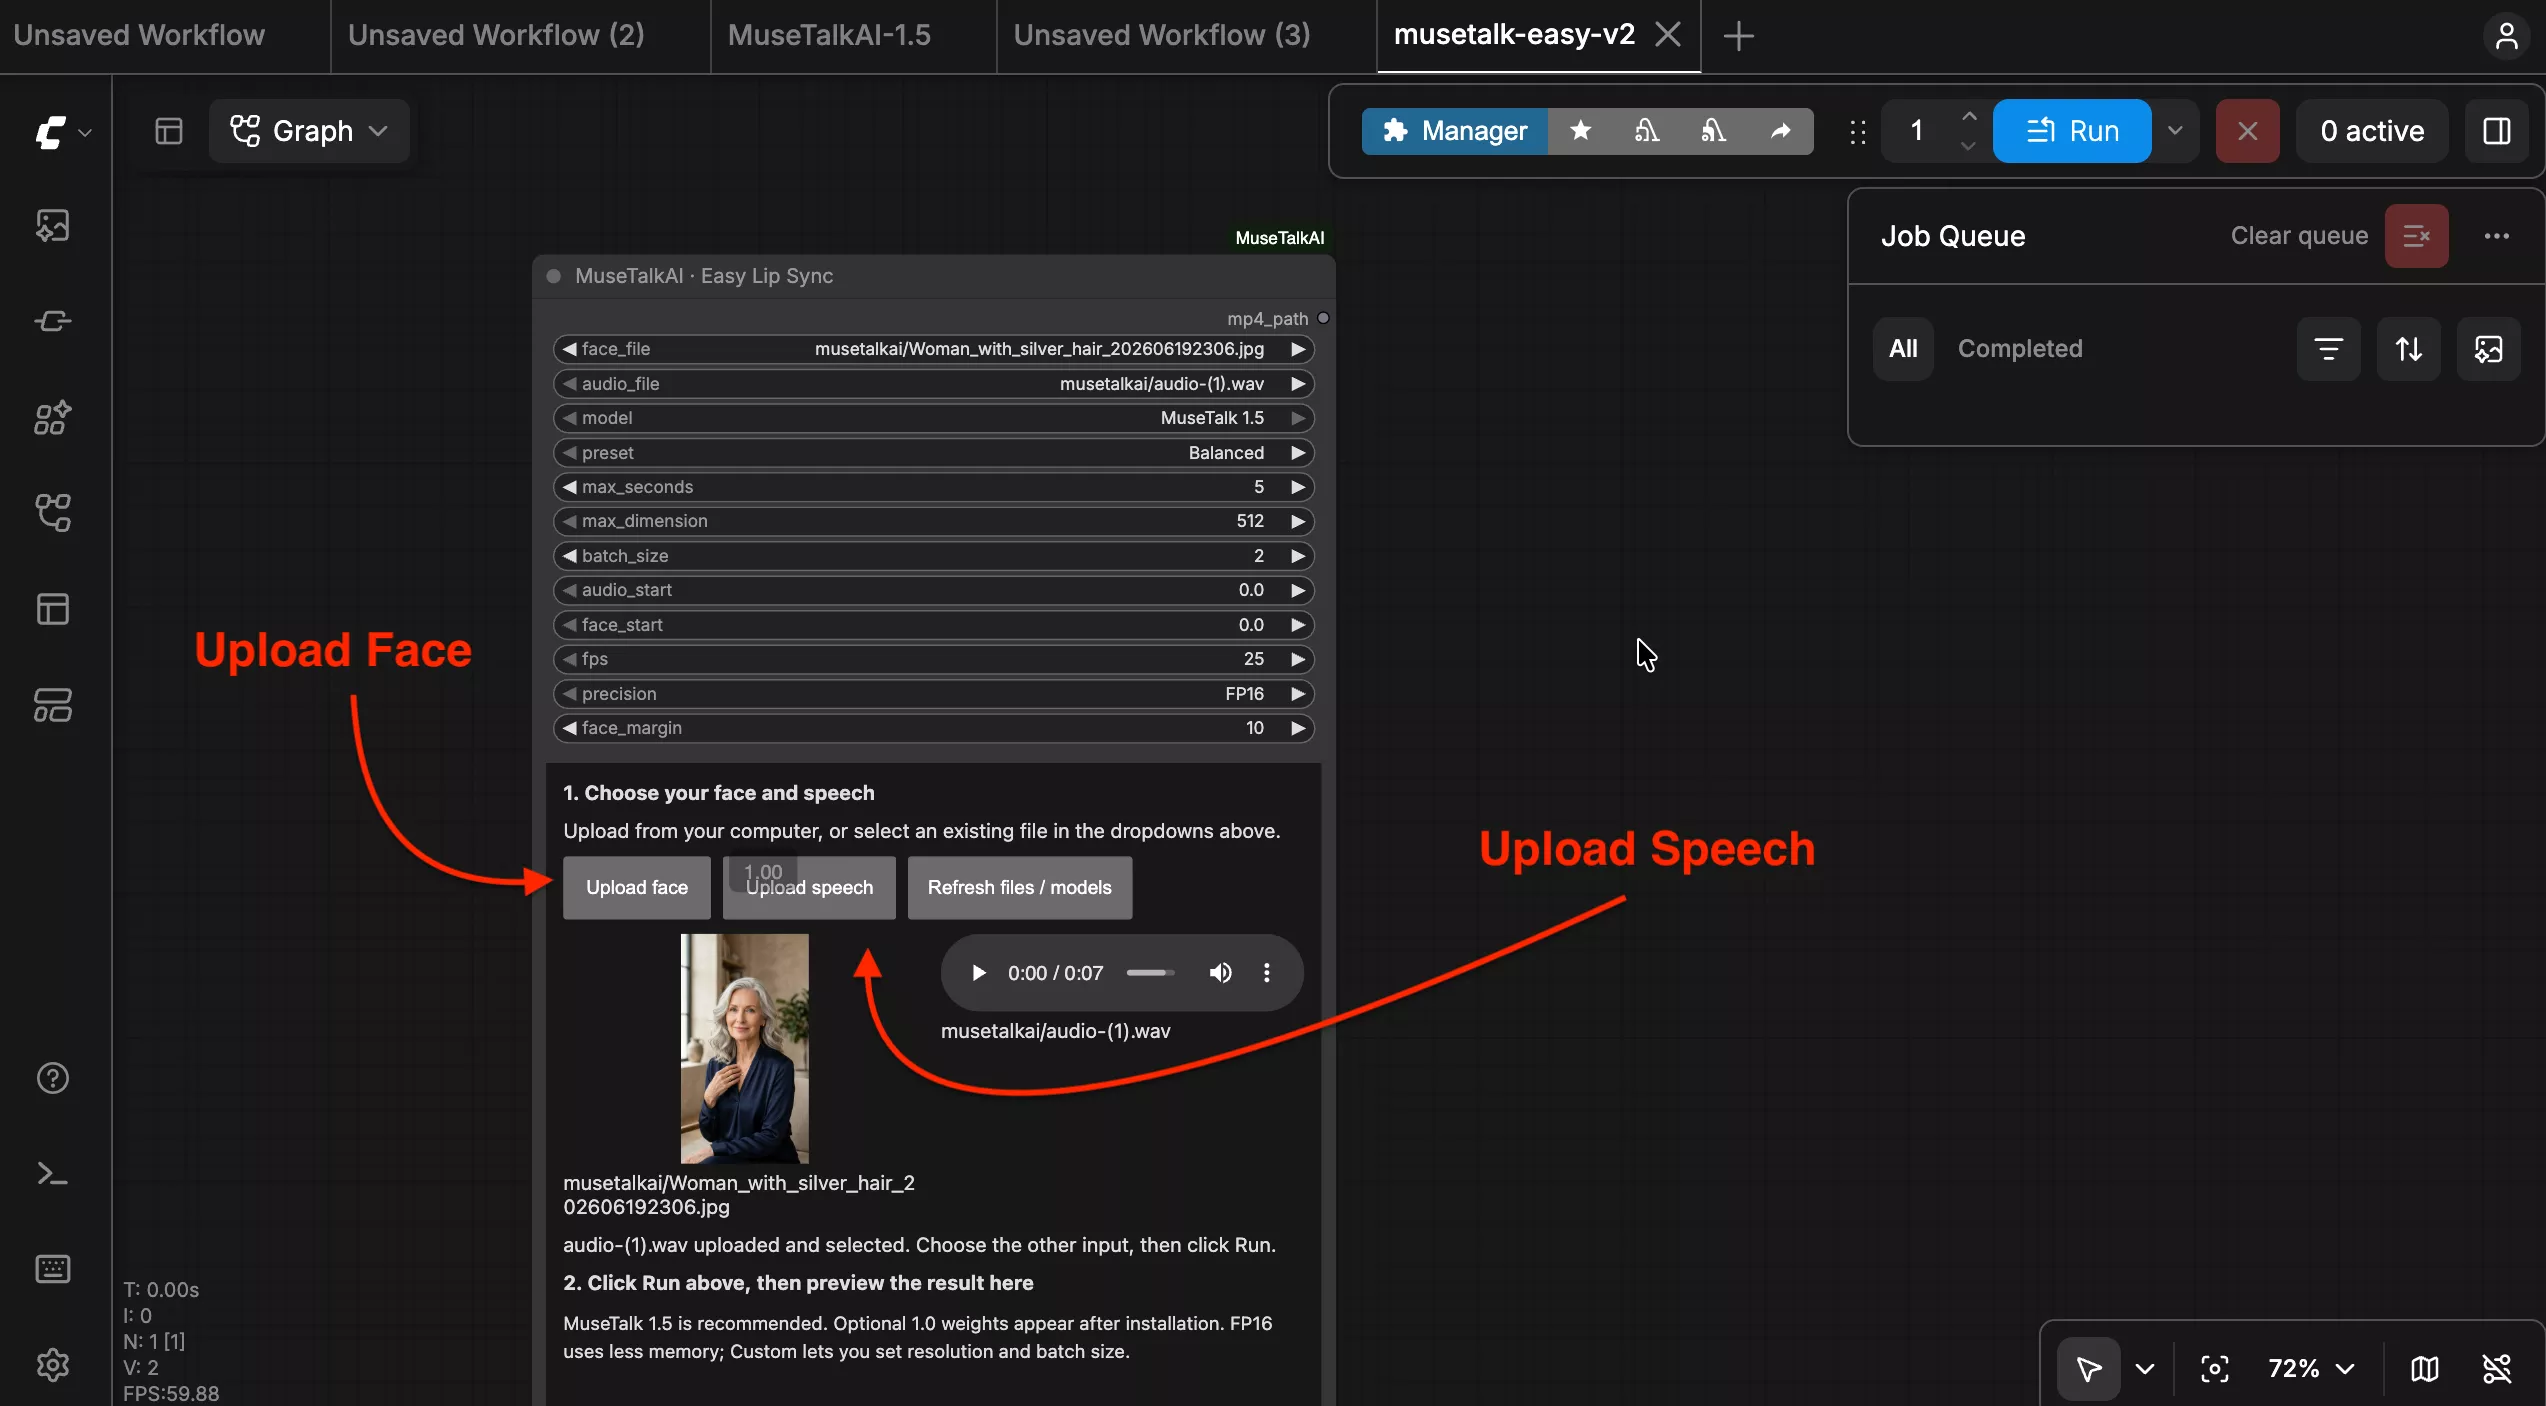
- Upload face. Pick a portrait for a steady pose, or a source video to retain its existing movement.
- Upload speech. Select the finished narration that you want the face to speak.
- Start with the preset. In this node, choose MuseTalk 1.5, Balanced, 5 seconds, 25 FPS and FP16. Run, then replay the result.
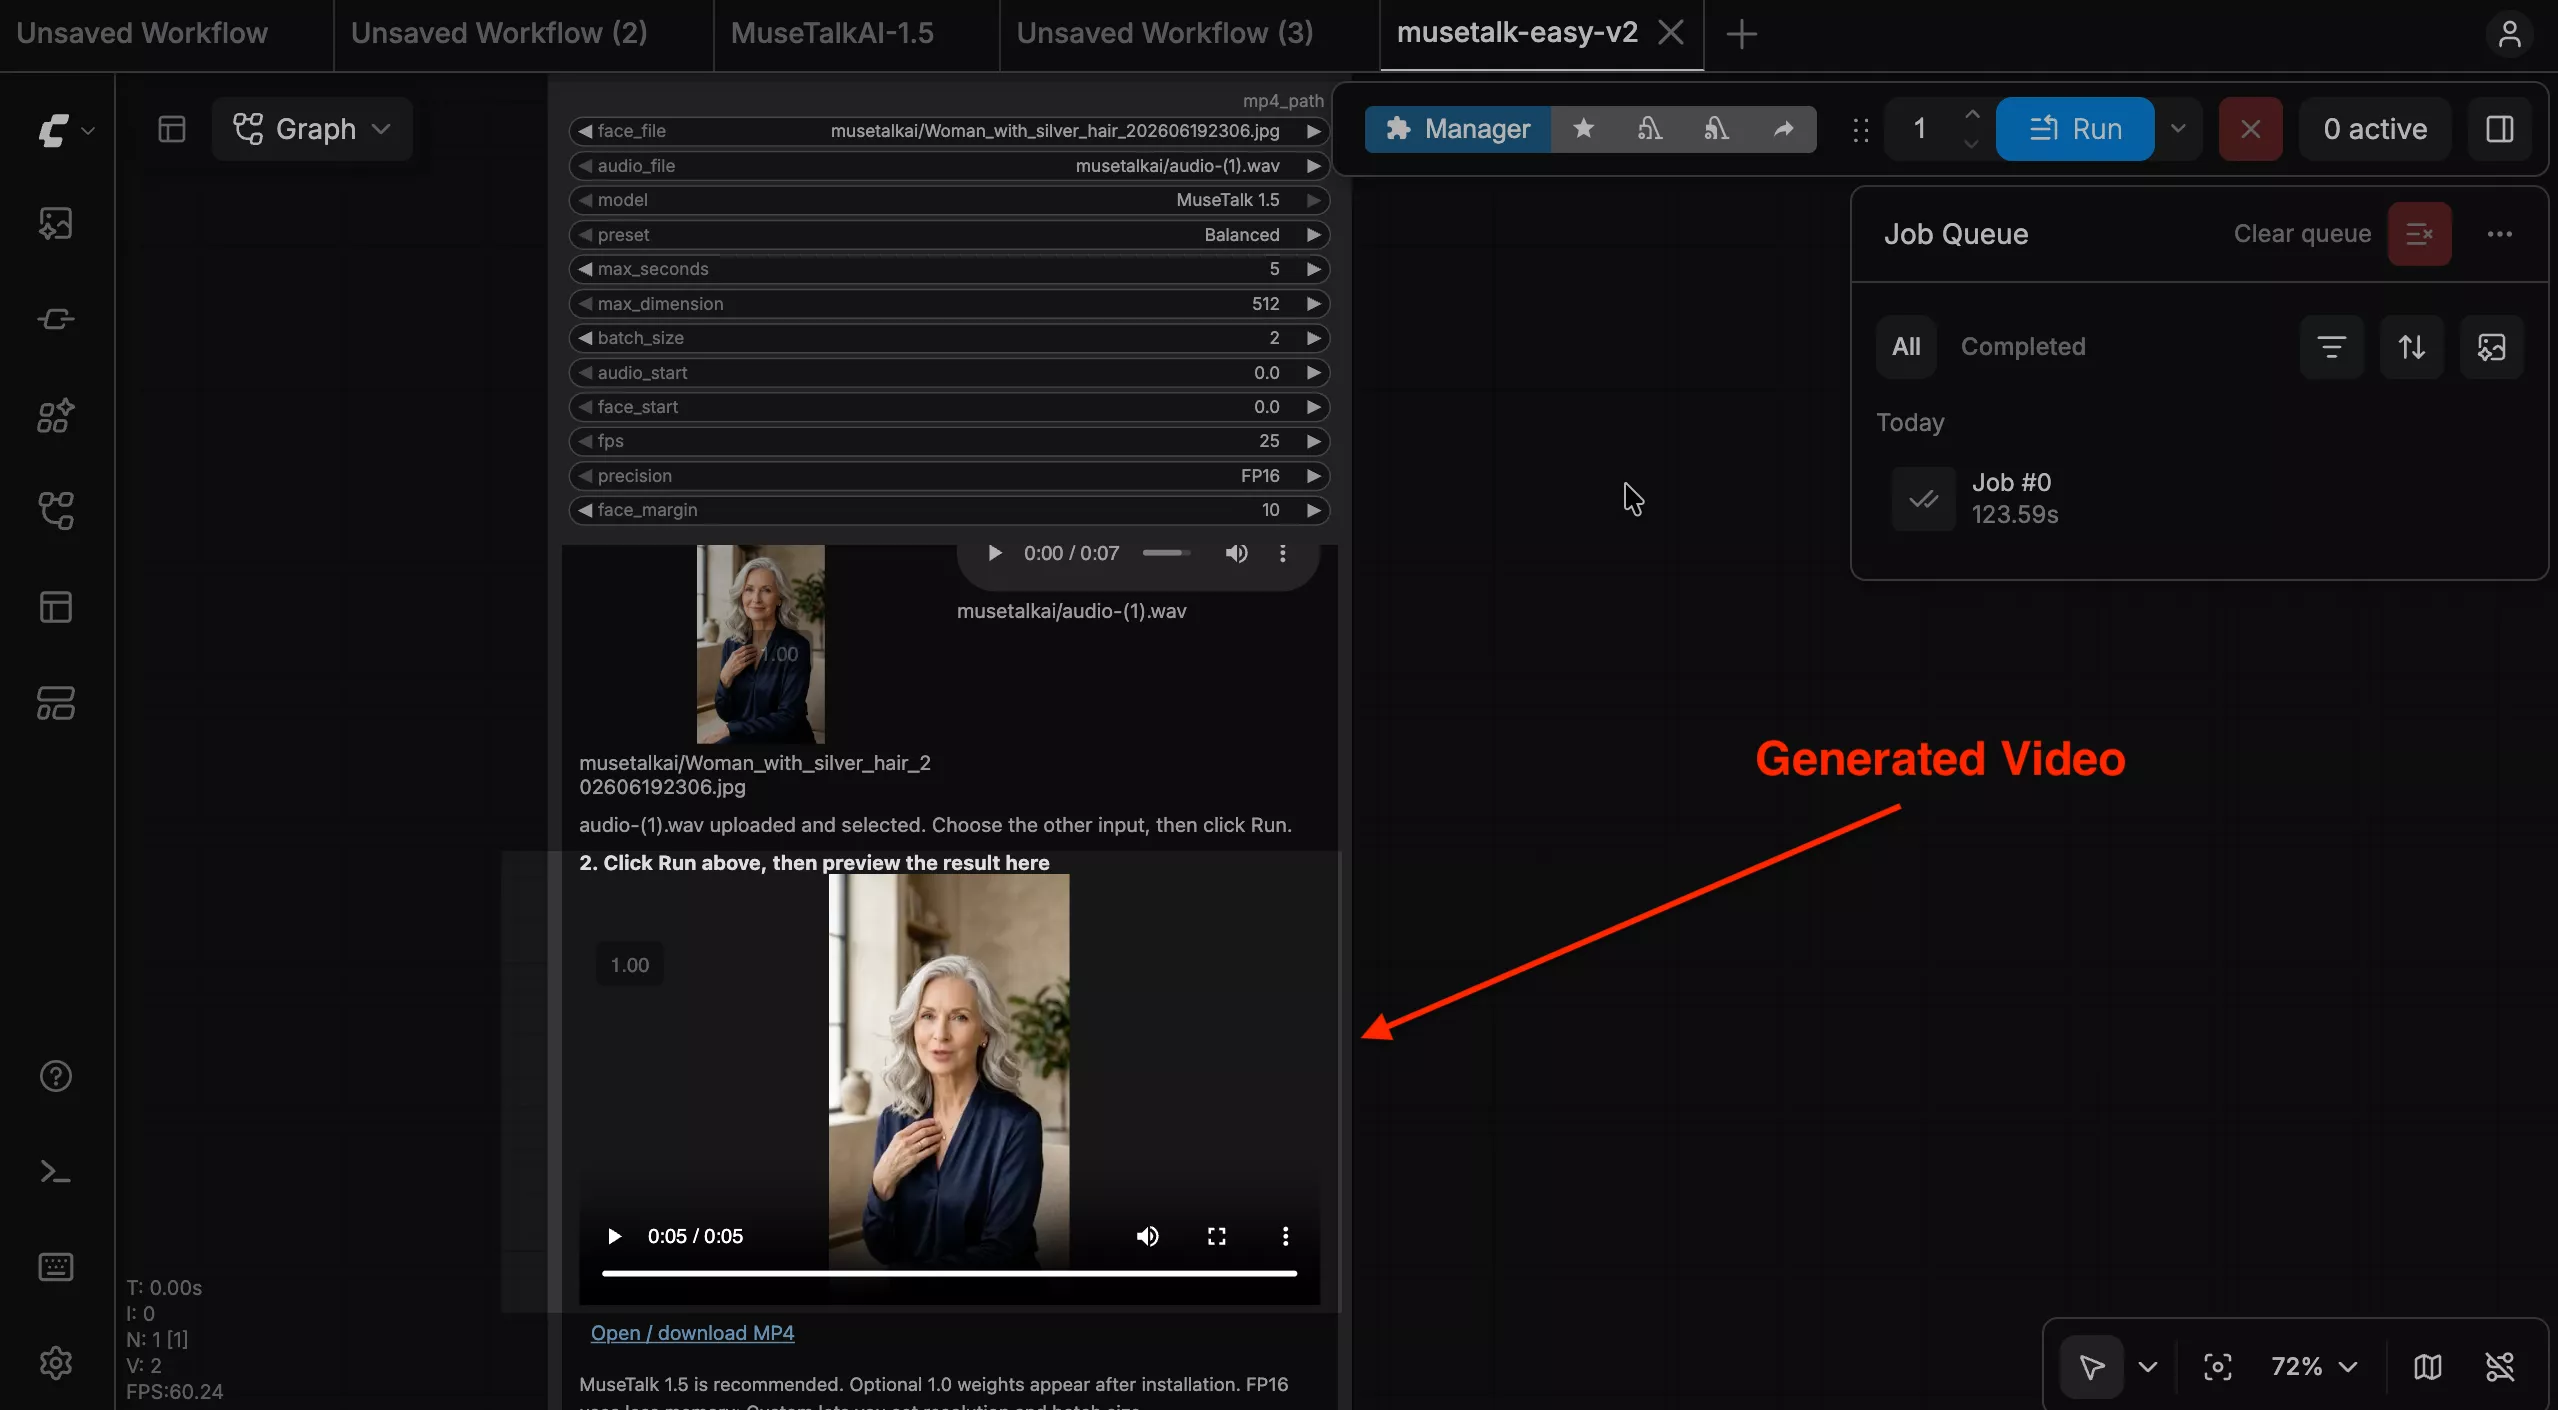
See where the generated video appears
05 / YOUR FIRST CLIP
Go from an idea to a useful preview
Make a 5–10 second preview first. A short clip makes it easy to compare framing, pronunciation and mouth movement before you render the complete narration.
With SadTalker
- Prepare a portrait. Use one well-lit face, facing toward the camera, with space around the head.
- Prepare your voice. Record or export a clean narration. Listen once for pauses and pronunciation.
- Pick your route. Try the demo, use Google Colab, or follow the local installation guide.
- Render a starter clip. Choose 256, crop, batch 2, and enhancement off. Try still mode for a calm presentation style.
- Refine one setting. Compare your preview, then try 512 or face enhancement if your delivery format benefits from it.
With MuseTalk
- Choose the visual source. A clear presenter video preserves its motion. A photo gives a steady portrait.
- Finish the new speech. For dubbing, make the narration length fit the section of video you want to reuse.
- Pick your route. Use the official app or the community ComfyUI workflow shown above. Keep MuseTalk in its own Python environment.
- Render a starter clip. In the illustrated node, start with the Balanced preset, 25 FPS and FP16.
- Inspect the mouth crop. Watch the lips and cheek edges. Adjust crop alignment only if the preview shows a clear reason.
06 / MAKE IT LOOK BETTER
A simple quality checklist
Replay the same short sentence after each change. Keep the source, speech and framing consistent so you can see what improved.
Listen, then watch
Confirm the words and pauses first. Watch whether mouth closures line up with sounds such as “b,” “p” and “m.”
Watch the face edges
Look around the lips, cheeks, jaw and hairline as the face moves. A clear, well-lit source makes blending easier to inspect.
Choose the right movement
Use SadTalker’s still mode for a steadier presentation. With MuseTalk video input, choose a source whose gestures suit the new message.
Match the final screen
Preview at the size viewers will see. For a large talking face, compare higher-resolution or enhancement settings; for a small inset, keep the workflow economical.
For a fair personal comparison, use the same image and audio, turn extra face restoration off at first, and save each tool’s settings with its output. Compare native exports before adding subtitles, music or editing effects.
07 / PLAN THE RUN
GPU, speed and cost in plain English
What your GPU needs to hold
VRAM is the GPU’s working memory. Model weights, face processing and frame batches all use it. Start with a small batch and a short clip. Increase quality settings after your first successful render, and use the run record in the examples section as a concrete example of this page’s configuration.
Separate setup time from generation time
The first setup includes downloading models and installing the environment. A fresh render can also load models and prepare the face. MuseTalk’s prepared-avatar path reuses preparation for repeated speech, so measure that stage separately when planning many clips for one character.
The MuseTalk authors report over 30 FPS on an NVIDIA Tesla V100 for their realtime pipeline. That is a specific research configuration; our saved-MP4 comparison reports the complete command time on an RTX 3090. The authors describe that configuration in the MuseTalk research paper.
Estimate the cost of your own clip
Include setup and idle time if your provider bills while the machine is running. Reuse downloaded models for a batch of work, save your outputs, and finish the rental when you are done. A local GPU uses your existing hardware and electricity.
Understand the licenses
SadTalker’s official code uses Apache 2.0; MuseTalk’s uses MIT. Review the model and dependency terms for the exact workflow you choose. Use portraits, footage and audio you have permission to use, especially when publishing a recognizable person. See the source references.
08 / QUICK HELP
Questions beginners ask
Which is better for a beginner: SadTalker or MuseTalk?
Choose by your starting material. SadTalker is a practical first choice for a single photo that needs generated head movement. MuseTalk fits a video you want to keep while changing the speech. Both support a portrait with audio, and a short preview helps you choose the look you prefer.
Can MuseTalk animate a still photo?
Yes. The official inference configuration accepts an image, a video or a folder of images. With one photo, MuseTalk animates the mouth while the source pose stays mostly steady. Use a source video when you want existing head movement and gestures.
Can SadTalker replace the dialogue in my existing video?
SadTalker’s core workflow starts from a portrait and generates a new talking face. For a video whose pose and performance you want to preserve, MuseTalk’s video-input workflow is the more direct fit.
Do these tools create the voice too?
Start with a finished audio recording. You can record your voice or create narration separately with a text-to-speech tool. SadTalker and MuseTalk use that audio to drive the face; choose the voice and pronunciation before rendering.
Can I use Hindi or another language?
You can supply your own spoken audio. Try a short sentence in your target language and review the mouth timing alongside the original sound. Clear pronunciation, clean recording and a front-facing face make the first comparison easier.
Does 256 × 256 mean my whole video is only 256 pixels?
Face processing size and final video dimensions are different measurements. MuseTalk processes a 256 × 256 face region and blends it into the source frame. SadTalker offers 256- and 512-pixel model options, with the final framing determined by the selected workflow. Check the exported MP4 dimensions when choosing your delivery format.
Are SadTalker and MuseTalk free?
Their official code is open source. Running locally uses your computer; a rented GPU or a hosted service may charge for compute. Review the code, model and dependency licenses for your use case, and use portraits, footage and audio you have permission to use.
Should I choose a realtime workflow for my first video?
Start with a short saved MP4 so you can replay the result. MuseTalk’s prepared-avatar realtime path is useful when you repeatedly generate speech for the same source. Prepare the avatar first, then measure the repeated generation stage separately from setup.
09 / KEEP EXPLORING
Sources and practical next steps
Technical descriptions follow the official projects. The screenshots demonstrate our community workflows; the same-input media and run records document the configuration used for this article.
- SadTalker official repository and project documentation
- MuseTalk official repository and inference documentation
- MuseTalk research paper: Real-Time High-Fidelity Video Dubbing via Spatio-Temporal Sampling
Ready to make your first talking photo?
Start with one portrait and a few seconds of clear speech. Get a useful preview, then refine it.