Actual Docker output
This is the demo you’ll run.
A roughly 3.36-second clip, generated with the 512 model, crop mode, still mode and GFPGAN face enhancement.
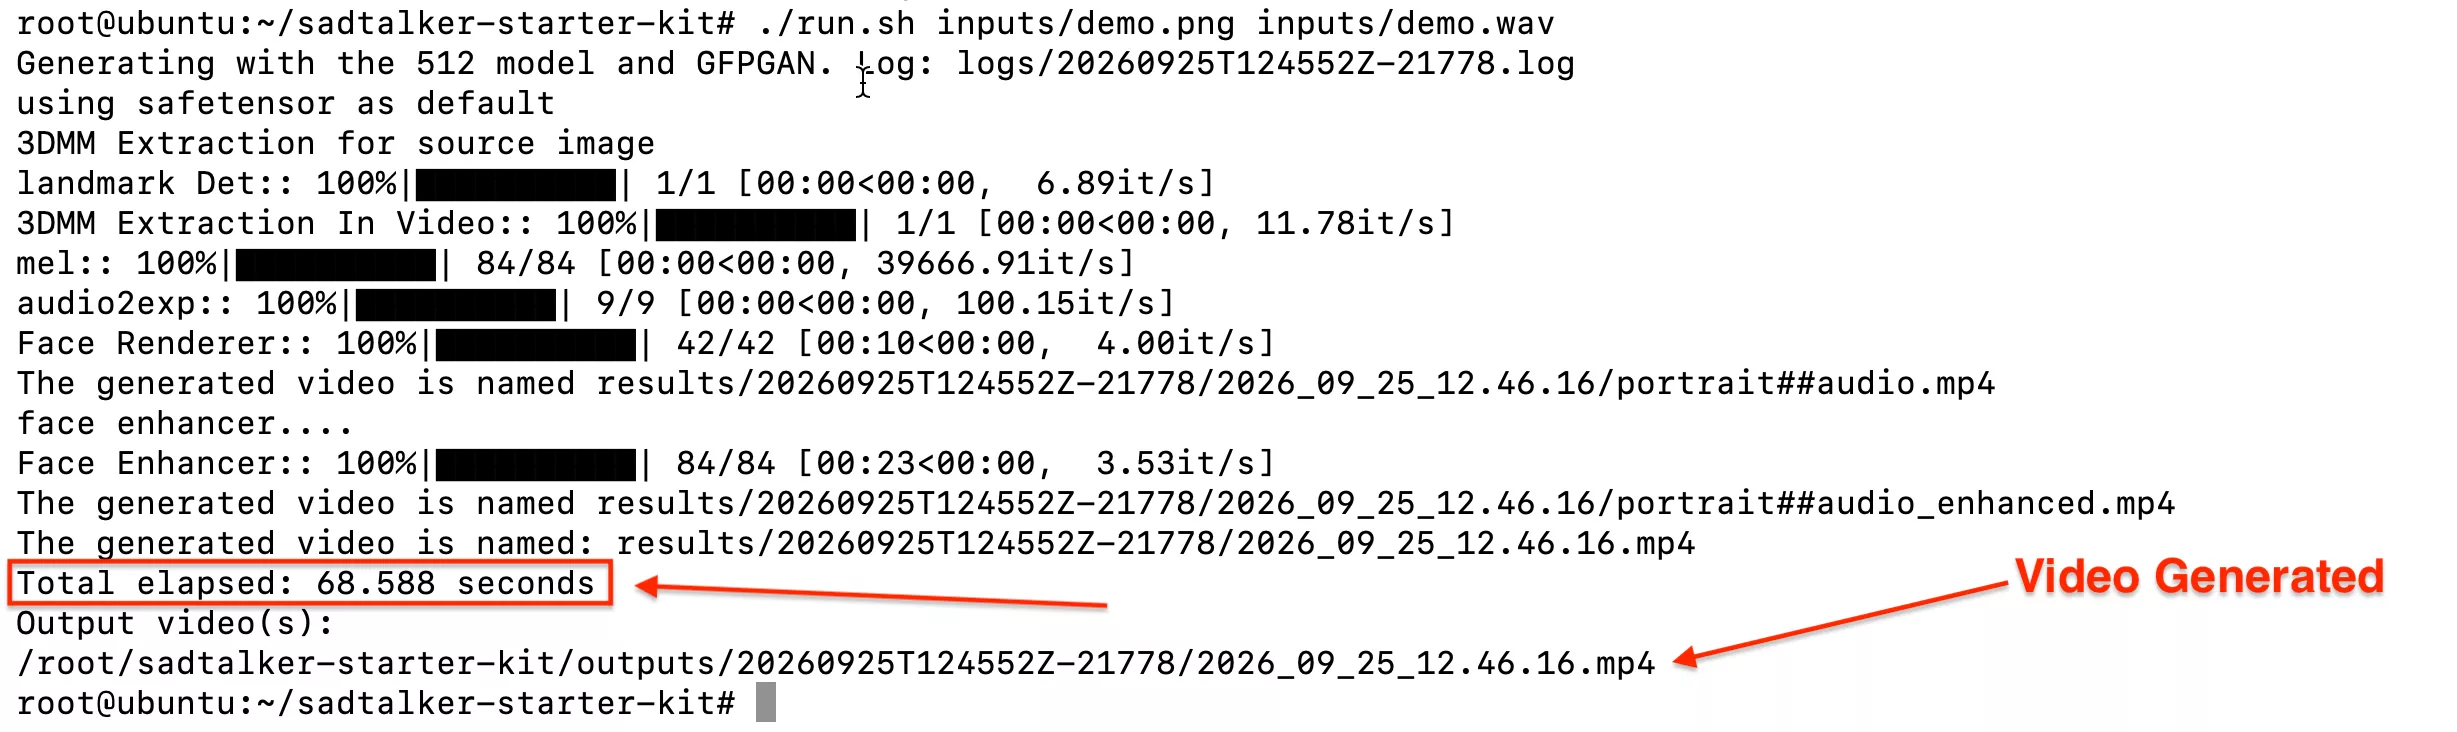
68.588 seconds
One RTX 4090 run, including startup and model loading. Your time will vary.
1. Check the machine first
Run the commands on the Linux machine that has the NVIDIA GPU. If you rented a GPU server, connect to it over SSH first. Your Mac or Windows laptop can be the control computer; don’t run the setup in its local terminal by mistake.
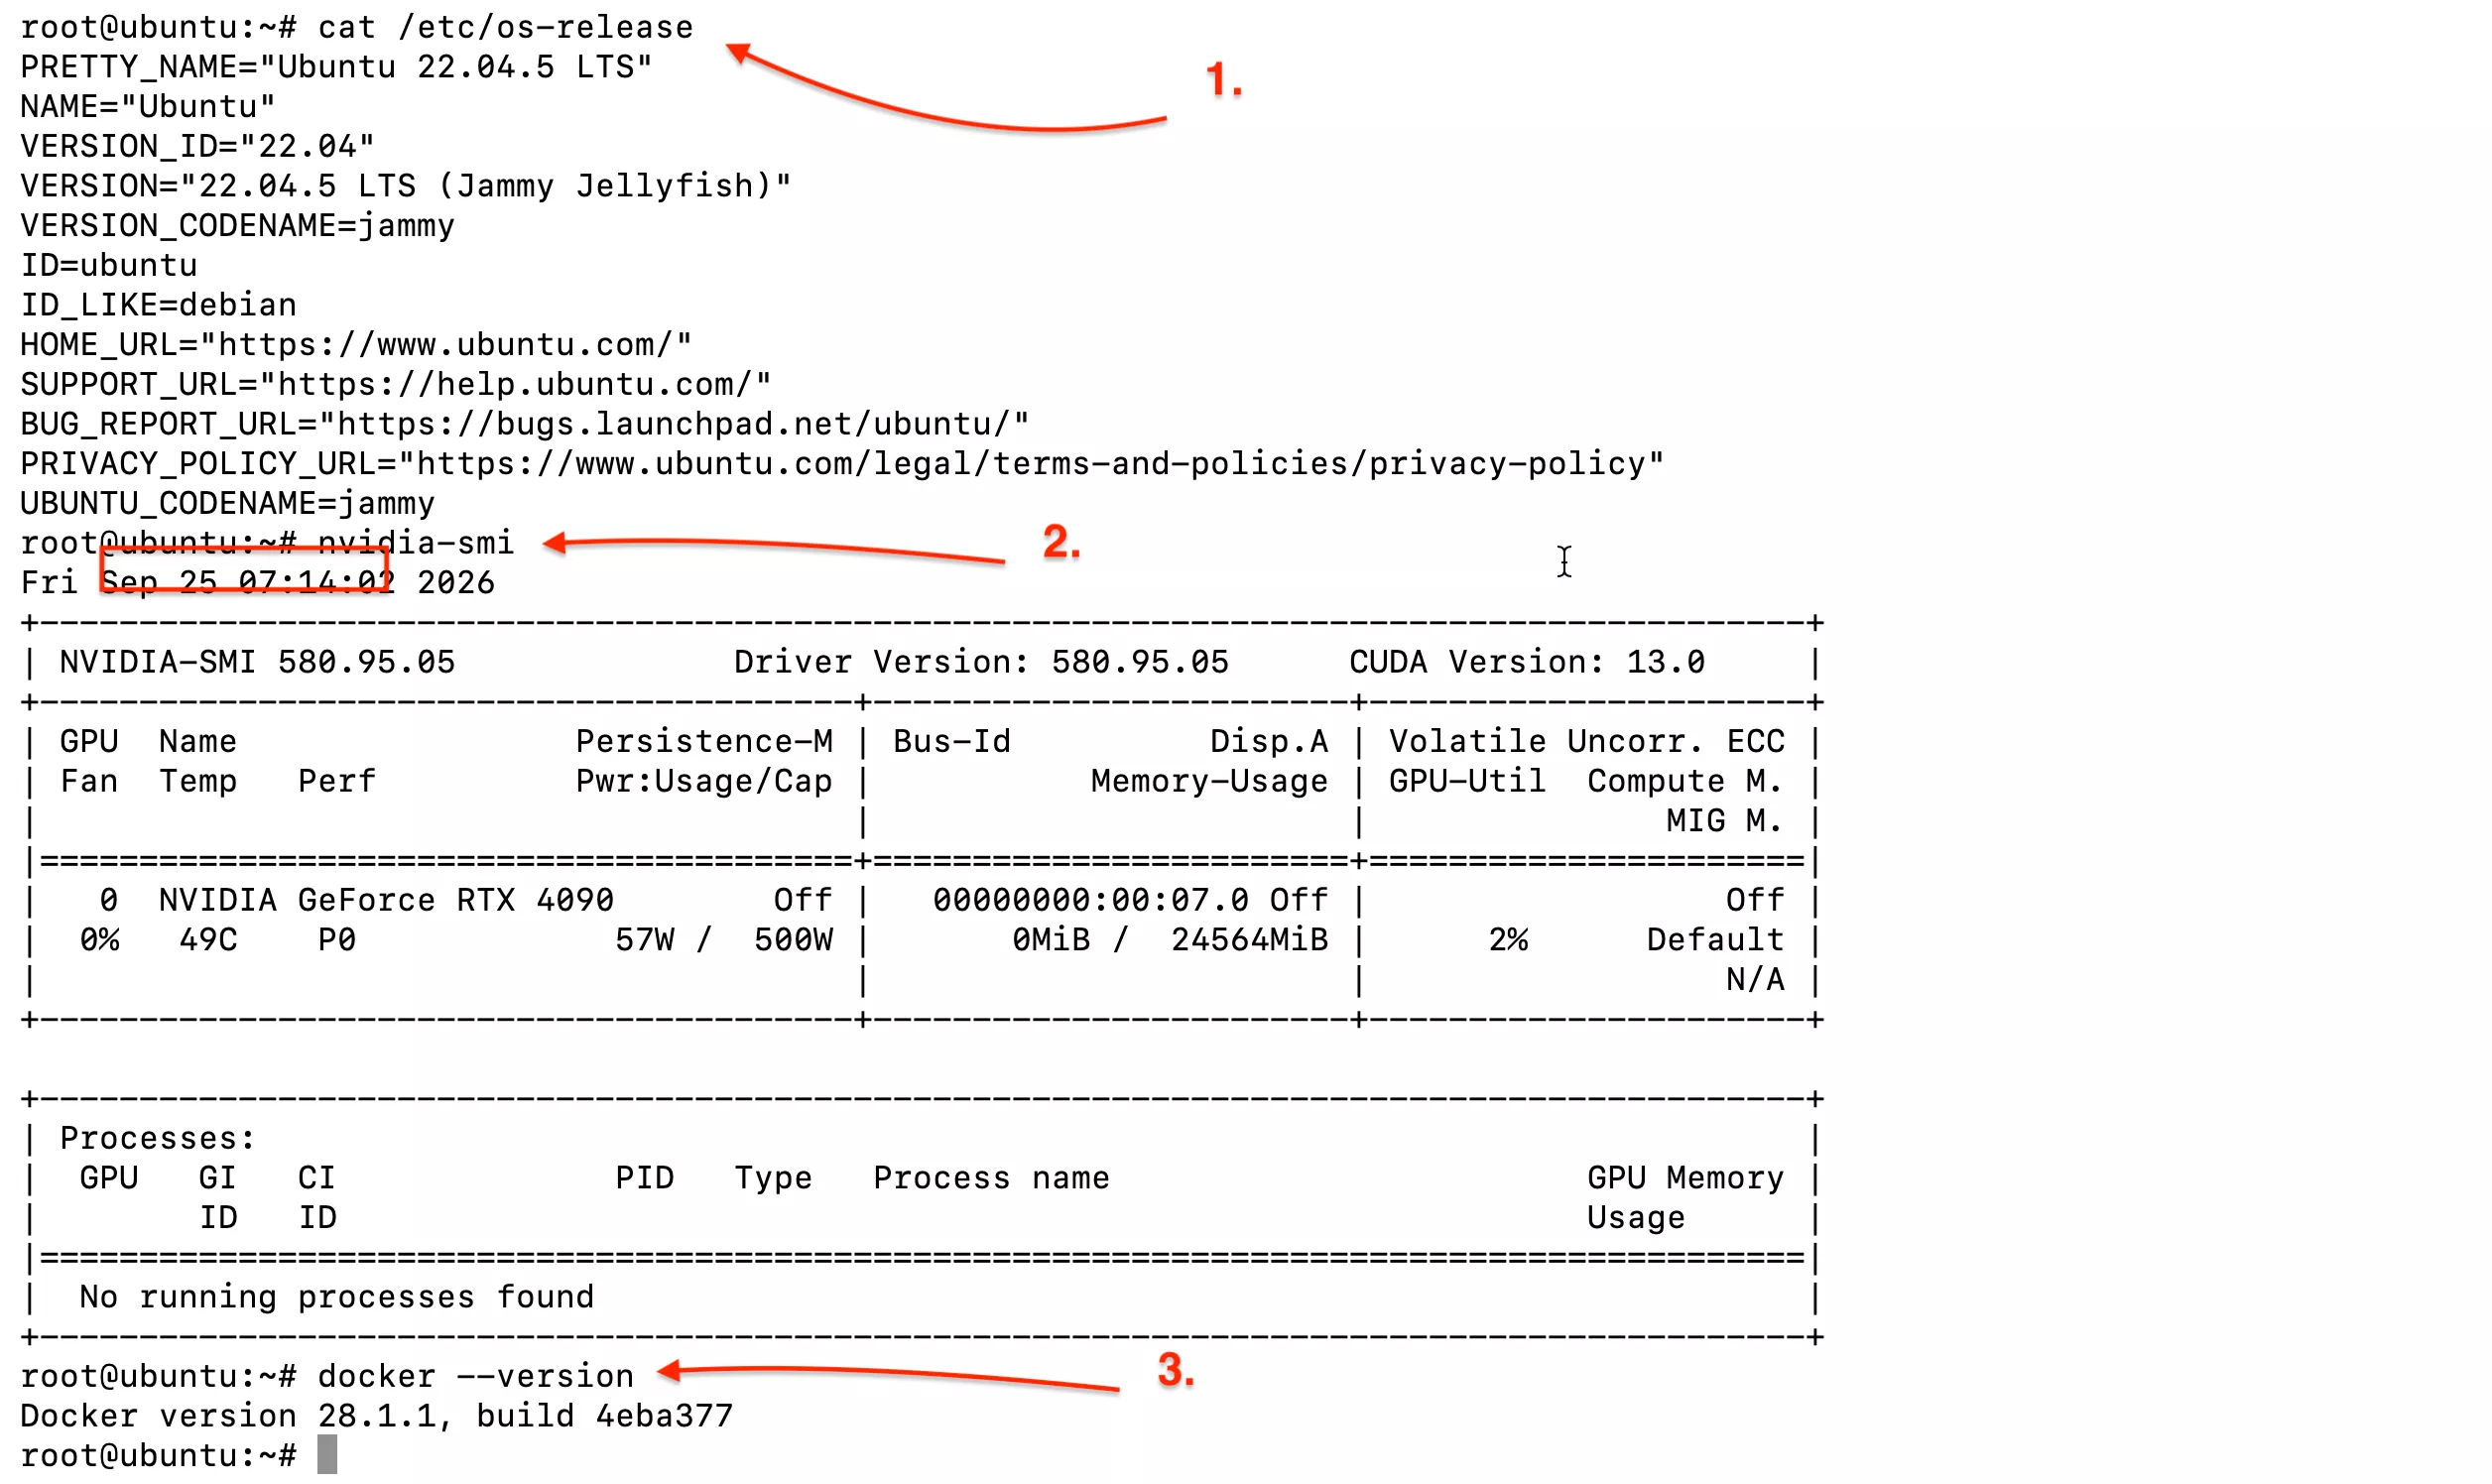
- A Linux NVIDIA GPU host or VM. Our test used Ubuntu 22.04.5 and an RTX 4090.
- A working NVIDIA driver, Docker Engine, and NVIDIA Container Toolkit configured for Docker.
- Bash, curl and unzip, an internet connection, and an account allowed to run Docker.
- Free space for the image, models and temporary files. See the measured disk footprint before using a small server disk.
nvidia-smi
docker --version
docker info --format '{{json .Runtimes}}'
command -v bash curl unzip
You should see your GPU, a Docker version, nvidia in the runtime list, and paths for all three utilities. Fix a failed check before starting the kit. If curl or unzip is missing on Ubuntu, install it with sudo apt-get update && sudo apt-get install -y curl unzip.
Docker or the NVIDIA runtime isn’t ready?
Follow Docker’s Ubuntu installation guide and NVIDIA’s Container Toolkit instructions. The kit does not install drivers or system packages.
For a regular system-wide Docker installation, after the toolkit is installed, NVIDIA documents these configuration commands. Restarting Docker can interrupt other running containers, so do this when they can be stopped.
sudo nvidia-ctk runtime configure --runtime=docker
sudo systemctl restart docker
On a managed GPU service, use its Docker-capable host or VM and provider instructions. A GPU-enabled notebook container does not necessarily let you run Docker inside it. Rootless Docker needs the separate configuration in NVIDIA’s guide.
2. Run your first video
Use a fresh working folder for the first setup. The ZIP contains the tested scripts and Dockerfile; the image and model weights are fetched separately. If you already saved the ZIP on the server, skip the curl command and open the folder containing it.
Get the kit onto the GPU machine
mkdir -p ~/sadtalker-work
cd ~/sadtalker-work
curl -fL --retry 3 -o sadtalker-starter-kit.zip \
  https://sadtalker.ai/sadtalker-docker/sadtalker-starter-kit.zip
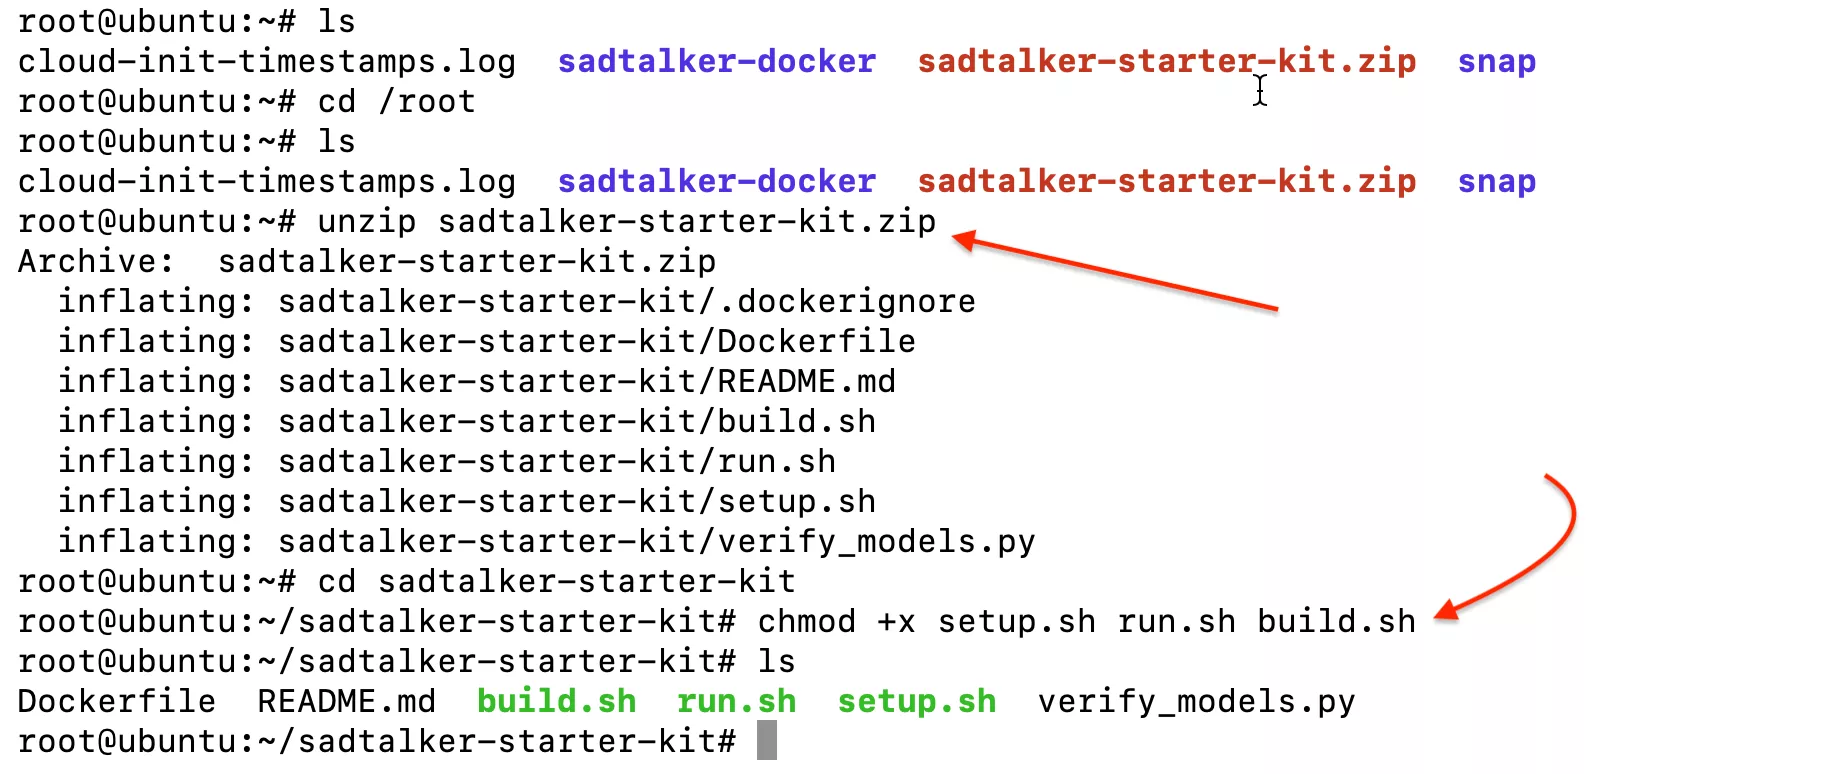
unzip sadtalker-starter-kit.zip
cd sadtalker-starter-kit
chmod +x setup.sh run.sh build.sh
The prompt should now be inside sadtalker-starter-kit. Use a folder path you can write to; the /root path in our screenshots is specific to the test server.
Let setup finish
./setup.shSetup pulls the fixed image if needed, checks a real GPU calculation, fetches missing models, and prepares a demo portrait and audio clip. The first run takes longer; keep the terminal open until you see:
GPU OK: NVIDIA GeForce RTX 4090
… model checks …
Setup complete. Run: ./run.sh inputs/demo.png inputs/demo.wav
Your GPU name may differ. If setup stops with an error, use the matching fix below, then run ./setup.sh again in this same folder.
Generate the bundled demo
./run.sh inputs/demo.png inputs/demo.wavWait for Output video(s): and the MP4 path. That is your finished file. The progress bars alone don’t mean the whole run has finished.
3. Use your own portrait and audio
Copy a clear portrait to inputs/portrait.png and your voice recording to inputs/speech.wav. Start with a short clip and one clearly visible face so you can check the result before a longer run.
./run.sh inputs/portrait.png inputs/speech.wavPNG and JPG/JPEG images are accepted. Audio can be WAV, MP3, M4A, FLAC or OGG. Keep the file’s real extension; renaming an MP3 to WAV does not convert it. Put quotes around paths containing spaces:
./run.sh "inputs/my portrait.jpg" "inputs/my voice.mp3"The launcher always uses 512 + crop + still + GFPGAN. It accepts two file paths, not extra inference flags. It creates a separate input copy and output folder for each job. On later sessions, return to the same kit folder and run the launcher; there is no need to repeat setup unless something is missing.
My inputs are on my laptop, not the server
Use your usual SFTP client, or run this on your laptop. Replace every uppercase placeholder with your server details. REMOTE_KIT_PATH is the absolute kit path on the server, which you can get by running pwd inside it.
scp -P SSH_PORT ./portrait.png ./speech.wav USER@HOST:REMOTE_KIT_PATH/inputs/Then return to the server terminal and run the command above. An SSH port is not a WebUI port.
4. Find and play your MP4
The terminal’s last path points to a file under outputs/<run-id>/. On a Linux desktop, open that file in your video player. On a remote server, copy it to your laptop to play it.
find "$PWD/outputs" -type f -name '*.mp4'To retrieve one from a server, run this on your laptop. Replace REMOTE_MP4_PATH with the full path printed by the launcher, as well as the connection placeholders:
scp -P SSH_PORT USER@HOST:REMOTE_MP4_PATH ./sadtalker-result.mp4SadTalker may print an internal results/… path during processing. The launcher’s final outputs/… path is the location on your machine. The 512 setting selects the model size; it is not a promise that the enhanced MP4 will be exactly 512 × 512.
If you rented the GPU, save your videos and anything you want to keep before ending the rental. Closing SSH does not stop server billing.
5. Keep your models and videos between runs
The launcher mounts ordinary folders from the kit into the container. These are bind mounts, so models and finished videos remain on the host after the temporary container exits.
| In your kit folder | Inside the container | What stays here |
|---|---|---|
| checkpoints/ | /app/checkpoints | SadTalker model weights |
| gfpgan/weights/ | /app/gfpgan/weights | Face enhancement weights |
| inputs/job-<run-id>/ | /app/inputs (read-only) | Copies of that job’s inputs |
| outputs/ | /app/results | Generated videos |
| logs/ | Written by the host launcher | Setup and generation logs |
How much disk space does it use?
Our test notes report 6.76 GB for the Docker image, 1.7G for checkpoints and 703M for GFPGAN weights. Docker and du report sizes differently, so treat these as measured components, not an exact total or a minimum disk specification.
Leave additional room for image extraction, partial files, the operating system, and your videos. A source build needs more room again. Check both the Docker disk and the kit folder if they are on different drives:
docker system df
printf 'Docker storage: '
docker info --format '{{.DockerRootDir}}'
df -h .
du -sh checkpoints gfpgan/weights outputs logs
Keep using the same folder to reuse weights. Extracting another kit elsewhere creates a separate model store. --rm removes the run’s temporary container, not these host folders. Avoid deleting the kit or pruning Docker storage just to retry a failed run.
6. If a step stops, fix that step
Read the last error before trying again. These checks address the script’s failure messages and common host problems; they are not a claim that every failure below was reproduced on the test server.
Docker is missing / cannot access Docker
Start Docker on the GPU host and check that docker info works with your current account. Follow your host’s Docker access instructions. Don’t make the Docker socket world-writable. Installing Python on your laptop won’t fix this error.
Unknown runtime nvidia / could not select a GPU device driver
Docker has not been configured to use the NVIDIA runtime, or your rented environment cannot run GPU containers. Check nvidia-smi, then the runtime list in step 1. Use the toolkit instructions there; keep both --runtime=nvidia and --gpus all in this tested kit.
CUDA unavailable or the GPU computation check fails
Fix host GPU access before continuing. Setup checks actual tensor computation, not just whether a GPU name is visible. The tested image uses PyTorch 2.0.1 with CUDA 11.8; the CUDA number shown by nvidia-smi describes driver capability and need not match it. Newer or different GPU architectures have not been verified with this image.
Image pull fails or Docker Hub reports a limit
Check connectivity and the exact image reference under Test details. For a registry rate limit, follow Docker Hub’s message and sign in with your own account if needed. Rerun ./setup.sh after resolving it. Our anonymous-access check reused cached image layers.
MISSING/TOO SMALL model or interrupted model transfer
Read logs/download-models.log, check free disk space, then rerun ./setup.sh in the same folder. Transfers use continuation and retries. The checker verifies presence and plausible file size, not cryptographic integrity. If inference identifies a corrupt model that passes that check, remove only that specific model and rerun setup.
Input file missing / no face detected
Check the file path and extension, quote names with spaces, and use a clear portrait with a visible face. Run the bundled demo again to distinguish an input problem from a broken setup. For a remote server, files must be on the server, not only on your laptop.
CUDA out of memory
Stop other GPU workloads you control and retry the short demo. This kit uses the 512 model and GFPGAN; other GPUs and minimum VRAM were not established in this test. Lower-resolution CLI settings require a separate configuration, not extra arguments added to run.sh.
No space left on device / permission denied
Check the host folder and Docker storage drive. Use a writable kit folder and a consistent account. Fix ownership for the specific affected folder if files were created as root. Keep models and outputs you need; don’t use a blanket deletion or chmod 777 as a shortcut.
Each generation writes a log to logs/<run-id>.log, including failed runs. Open the log path shown when the launcher starts. It helps identify whether the problem happened while reading inputs, loading a model, generating frames or enhancing the face.
7. What about the browser WebUI?
This Docker release is tested for the command line. The kit does not start a browser interface, expose a port, or create a Gradio link. Running ./run.sh produces an MP4 directly.
A Docker WebUI launch has not been verified with this image, so there is no tested WebUI command in this guide yet. If you want a browser interface now, use the separate Windows WebUI guide or GitHub setup guide. Those are different installation routes.
Windows Docker/WSL and macOS GPU execution are also outside this kit’s tested scope. You can still use either computer to connect to the tested Linux GPU host over SSH.
8. Exactly what we tested
- Test date
- 25 September 2026
- Host
- Ubuntu 22.04.5 · NVIDIA RTX 4090
- Driver / Docker
- 580.95.05 / 28.1.1
- PyTorch
- 2.0.1+cu118
- SadTalker source
- cd4c046
- Demo settings
- 512 · crop · still · GFPGAN
The updated setup and generation scripts passed using the published image reference. The final demo took 68.588 seconds. An earlier enhanced demo was played and approved during testing. These are results for this short clip on this machine, not a speed guarantee.
A clean-machine installation has not been tested. The anonymous pull used cached layers, and the final setup reused existing models. First-time transfers and a completely fresh host remain outside that evidence.
Use the same image
The readable version is sonukumar28/sadtalker:1.0.0. The scripts use the digest below so they request the exact tested image, even if a tag later changes.
sonukumar28/sadtalker@sha256:ec420a506684e2e26964a39ede490a654d77c025fcc90408ce2b3187bf5703eeThis starter kit is an independent wrapper for OpenTalker’s SadTalker, not an official upstream release. The image includes upstream source and its license; weights come separately from upstream sources.
9. Only build from source if you need to
You can skip this section for normal use. The ZIP includes the Dockerfile and build script for people who want to inspect or customize the image. Install Git first, then run these commands inside the kit folder:
./build.sh
SADTALKER_IMAGE=sadtalker:test ./setup.sh
SADTALKER_IMAGE=sadtalker:test ./run.sh inputs/demo.png inputs/demo.wav
The build checks out source revision cd4c046 and refuses to overwrite an existing build-source folder. Some dependencies are pinned, but the base image and all transitive dependencies are not fully locked. A fresh build may differ from the published image. Use the same SADTALKER_IMAGE setting for setup and generation.
Ready for your next clip?
Keep the kit folder, put your new files in inputs, and run the two-path command again. Your models are already there.